Matthew was back around last Sunday with his Fallschirmjäger for a top notch game of Bolt Action.
Battlefield and Mission
The mission we rolled was top secret. In this mission there is a central objective representing a drop of important intelligence or a high value target that requires retrieval. Once an infantry unit makes base contact with the objective they take possession of it. The unit must then move off its long table edge to successfully extract the item.
The item can be passed to another infantry unit within 1”, but may only pass between units once per turn. An enemy unit who defeats the unit carrying the objective in close combat also takes possession of the objective.
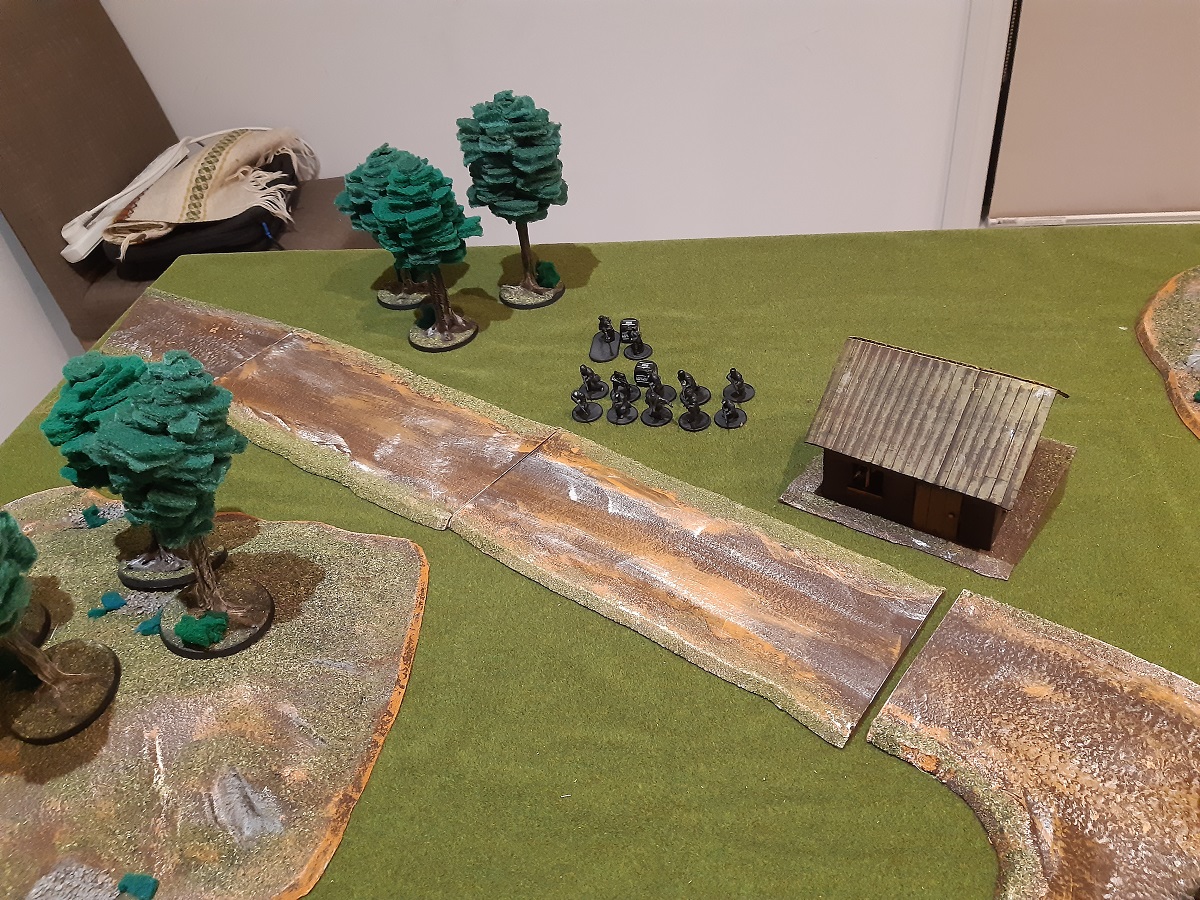
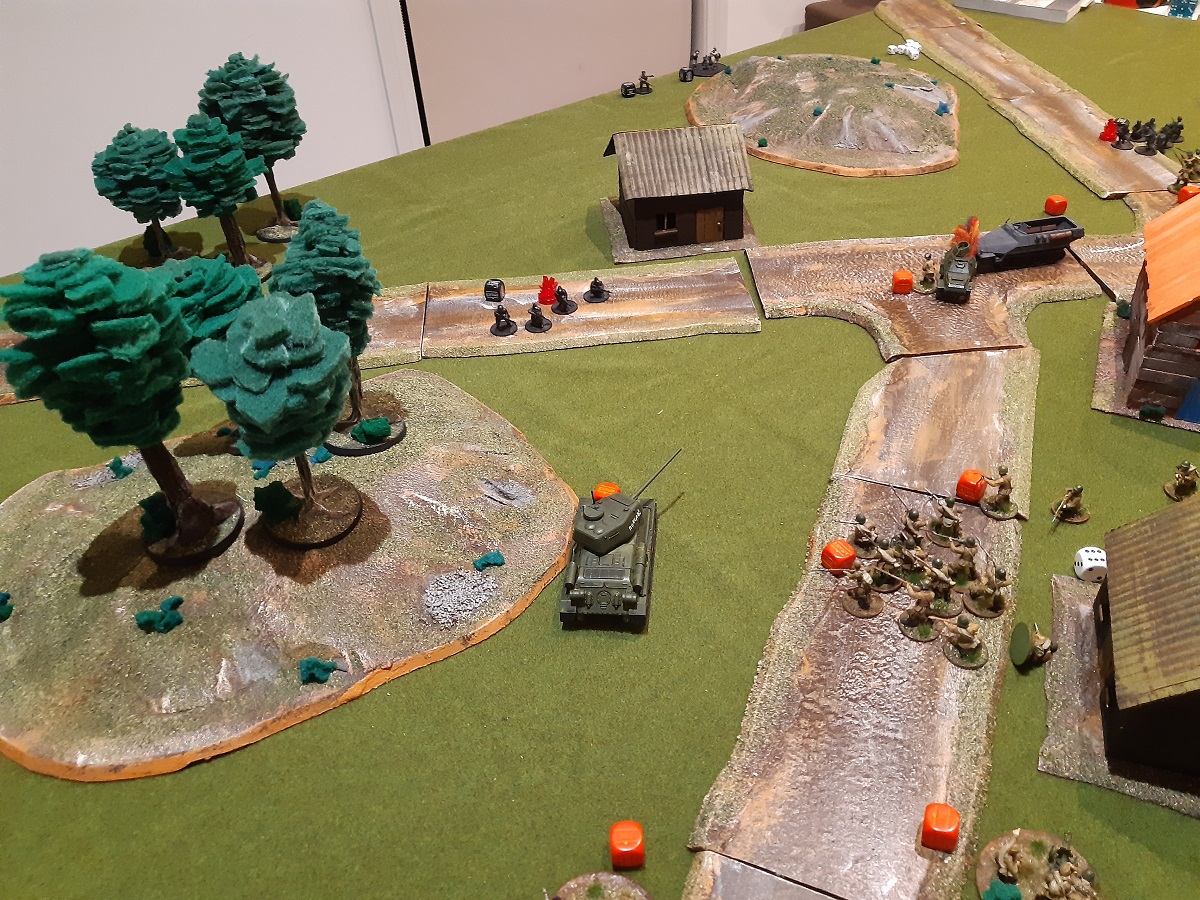
As it happened, I had set up the battlefield with a T intersection smack bang in the middle of the field. I placed my BA-64 there to represent the objective, orienting it to represent it having been knocked out after reconnoitring the German lines. Soviet and German forces were now scrambling to recover the vital intelligence. The below description of the battlefield is from my perspective.

A road entered from my long table edge on its far left. It traversed diagonally to a T intersection in the centre of the field. Turning left at the intersection, the road headed toward the far left corner of the field before turning off the far side of the short table edge.
Turning right at the central intersection, there was another T intersection. Continuing directly on, the road ran straight before veering slightly to head off the short table edge on my near right flank. Meanwhile, turning left at the second T intersection, the road carried on diagonally before turning slightly to exit off the right side of the opposite long table edge.

Returning to my left, a wooded hill occupied the central line of the battlefield, nestled between the two roads on that side. Forward of my mid left and on the near side of the road was a house. Opposite this house, over the two roads, was another. While on the far left was a small wood.
Forward of my centre, on my side of the central crossroad, was a barn. Beyond the central intersection the ground was open. Right of centre, a field spanned between my table edge and the second intersection. Beyond this intersection, forward and right of centre, was an open hill.
Finally, my near right flank was clear, but beyond the road on this side was another field, with a house positioned near the centre line between the field and the second intersection. Beyond the field and the house, the right flank was clear save for the road that headed off the table on the far side.
Disposition of Forces
I took a single reinforced platoon, all regular save the free rifle squad, consisting of:
- A 1st lieutenant and one staff;
- A medic;
- A 12 man rifle squad with AT grenades (the free squad);
- Three 12 man LMG squads with LMGs;
- A medium MG team (the Maxim);
- A medium mortar team;
- A flamethrower team;
- A Zis-3 divisional gun; and
A T34/85.
Matthew’s Fallschirmjäger, all veteran, fielded:
- A 1st lieutenant;
- A 10 man rifle squad with LMG;
- A 10 man assault rifle squad with LMG;
- A seven man SMG squad;
- A medium mortar team with spotter;
- A puma armoured car; and
- A Hanomag halftrack.
Order of Battle
In this mission, all forces are placed in reserve, but reserves begin coming on from turn one instead of turn two. And so it was straight to the bag to start pulling dice to see which forces would be arriving on time, and which would be caught napping.
With 11 order dice to Matthew’s 9, you’d be forgiven for thinking the battle would start with some red. Instead, the first units to enter the field were German. Matthew brought his half-track (and its accompanying payload of SMG troops) on via the right road, parking the vehicle just short of the second intersection to use the house on the right as cover. Next, his mortar ran on behind the far hill, while its spotter made his way into the far house.
I scored the next two dice, but to my great displeasure the curse of the 9s was back. My T34/85 failed its order test by one and went down. Thankfully my Zis passed and came on my left to cover the long road. More black dice followed, with Matthew bringing his assault rifles on the left, running them up just short of the far road, while his rifle squad came on the right, moving up behind the field.
My mortar then came on my left, forward of the near road, while I sent my flamethrower right up the guts, ending its move at the near left corner of the barn. Matthew responded by bringing his flamethrower on, running it up behind his assault rifles. Next the puma arrived, and landed a long range shot on the my mortar team, taking out two crew. Thankfully the last man passed his morale test to continue manning the tube on his lonesome.

With so many German units deployed, the bulk of my forces began showing themselves. I ran my rifle squad up through the field to face off with the half-track, while my 1st LMG squad came on just left of centre next to my flamethrower. I then brought up my medic between the three units, ready to apply first aid as needed.
I didn’t have to wait long, as Matthew used his next dice to advance his SMG squad out the half-track, guns blazing at my rifle squad. Six men would have gone down had my medic not been there to save one, preventing the squad from needing to test their morale. I rolled a 4 on their green test, meaning they would continue on as inexperienced troops.
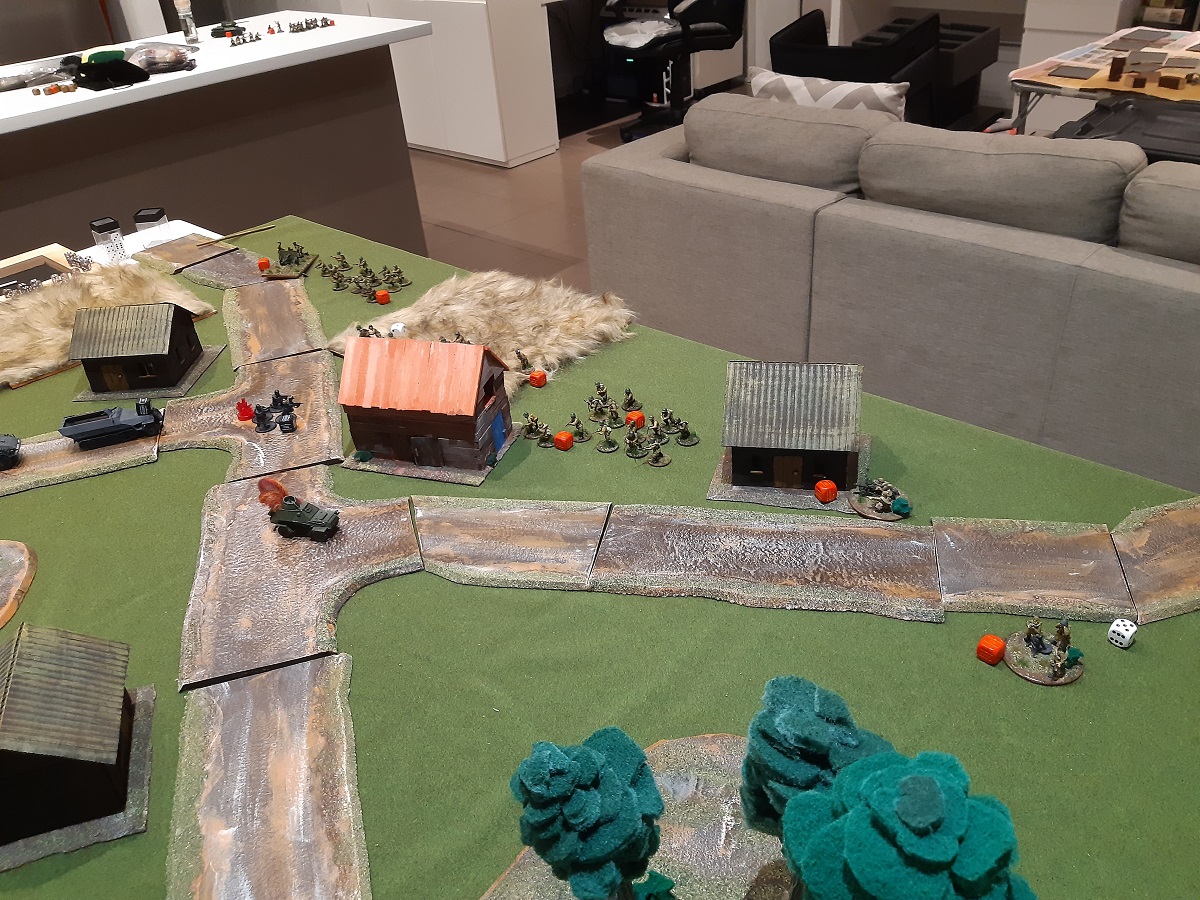
In response, I brought my 2nd LMG squad on to the right of the field with an advance. The hail of rifle and LMG fire they unleashed was devastating, cutting down three of the SMG squad. Unfortunately I proceeded to fail my next two order tests, which saw my lieutenant and my 3rd LMG squad go down.

The final moves of the turn saw the German lieutenant come on behind the hill next to the mortar, and my Maxim arrive on my centre left to hold back the advancing German assault rifles.
Turn two and I netted the first dice. I used it to immediately order my 2nd LMG squad to fire on the SMG squad, who went down in response. There was nowhere the perfidious fascists could hide from my noble heroes however, as incredibly sharp shooting saw three of the remaining four killed. Unfortunately the last man managed to pass his morale test to stick around, but I had effectively neutralised the threat the squad posed.
My good shooting continued as my Maxim managed to take out the LMG from the assault rifle squad opposite with a fire order and exceptional damage. My third and fourth dice then saw my Zis go in to ambush, while my 1st LMG squad advanced and fired on the assault rifles, killing two more from the squad.
Despite my desire that some black dice should start being drawn, the red kept coming. I repositioned my medic slightly to keep the 1st LMG squad in range, but moved too far and left the rifle squad slip out of range in the process. My lieutenant then ran on through the field. With yet another dice, I tried to range my mortar in on the Puma, but was unsuccessful. It was only then Matthew secured his first dice.
His mortar crew proceeded to show mine how it was done, ranging in on my 1st LMG squad and blowing five of them to smithereens. The German assault rifles then advanced under fire from the Zis, which sprung its ambush but failed to land its shell. The Germans opened up on my 1st LMG squad, killing another two.
My 3rd LMG squad then arrived. I advanced them on the left, next to my MG. Firing on the assault rifles, I managed to take out another from that squad. My rifle squad was not so lucky when I ordered it to fire on the lone SMG. Though I scored a hit, I failed to take the man out. I would have been better to charge in, but the two German vehicles and their MGs dissuaded me.
I only had two units left to issue orders to, yet still the red dice came. I opted to order my flame thrower down. Again, I would have loved to have run him into the middle to grab the objective, but those pesky German vehicles and their deadly machineguns stopped me.
Finally another black dice was drawn, and Matthew drove his hanomag straight forward to open up on my rifle squad at point blank range. It seemed the German crew was in need of the training my men had received, as they only managed to hit twice and then kill a single man. A dismal showing.
My final dice was then drawn and, with little options in where I could actually deploy, I advanced my T34/85 on the far left and sent a long range shot sailing over the Puma.

With all the remaining dice Matthew’s, he was free to order the rest of his units. His Puma sped forward, turned the corner, and came hooning into the face of my Zis, firing its main gun wildly. The rifle squad on the right ran up to the field on that side, while the flamethrower team continued along with the assault rifle squad. Finally Matthew’s lieutenant went down.
Turn three and I pulled the first dice again. I had a tough decision to make: order my Maxim to keep the pressure on the German assault rifles, or fire my Zis on the Puma. I went with the former, scoring another hit but no kills. Matthew then had his own tough decision to make when he netted the second dice of the turn. He opted to lob another mortar shell on my 1st LMG squad, who went down and lost another two men.

I netted another dice and this time gave the order for my Zis to fire. A few dice rolls and an almighty boom later and the Puma was knocked out thanks to massive damage, the 6 I rolled to penetrate having just seen the shot over the threshold.

The next two orders saw my mortar failed to range in on the assault rifles and the Hanomag take out three from my rifle squad, despite the squad going down in response. The tit for tat continued however when my 3rd LMG squad advanced and picked off another two from the assault rifle squad, including the NCO, though German initiative training saw that he was quickly replaced.
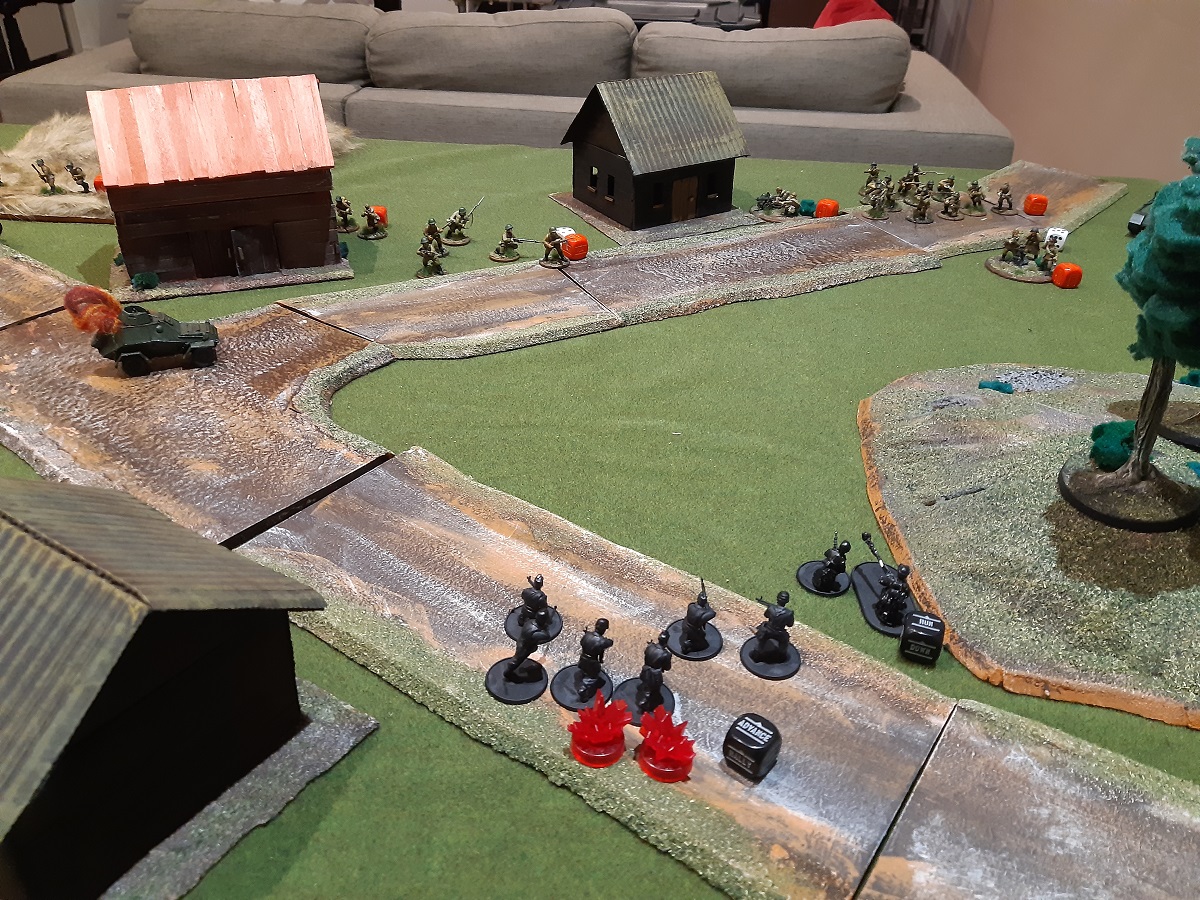
It was Matthew’s next order however that took me by complete surprise. He issued a run order to the lone SMG trooper, who dashed behind the objective and secured the intelligence. IO desperately wanted to put fire on the lone man, but didn’t have any units that could get an angle with a single order. In frustration I had my T34/85 advance and take out the German spotter.

The race to secure the intel was well and truly on however, as I sent my 2nd LMG squad running at the Hanomag, while Matthew ran his rifle squad across directly toward the middle. He was determined to cover his extraction, while I was pushing to stop his escape.
My flame thrower team ran up onto the other side of the objective, ready to pounce and reclaim the intel next turn, and I ran my medic up into the barn to support it. Meanwhile, my lieutenant advanced to the left of the barn, sending a wild shot at the German assault rifles,

Matthew’s last moves were to advance his flame thrower, which remained out of range of my units, and put his lieutenant down. As for his assault rifles, they failed an order test and went down earlier in the turn.
Turn four and, much to my delight, I secure the first dice. I advanced my flamethrower team passed the SMG trooper, blocking his escape, and unleashed a torrent of flame. The man died in screaming agony. Unfortunately the flamethrower operator evidently was somewhat overenthusiastic in the application of his horrific device as he drained it completely of fuel. And so my flamethrower team was removed with a solitary kill to its name.
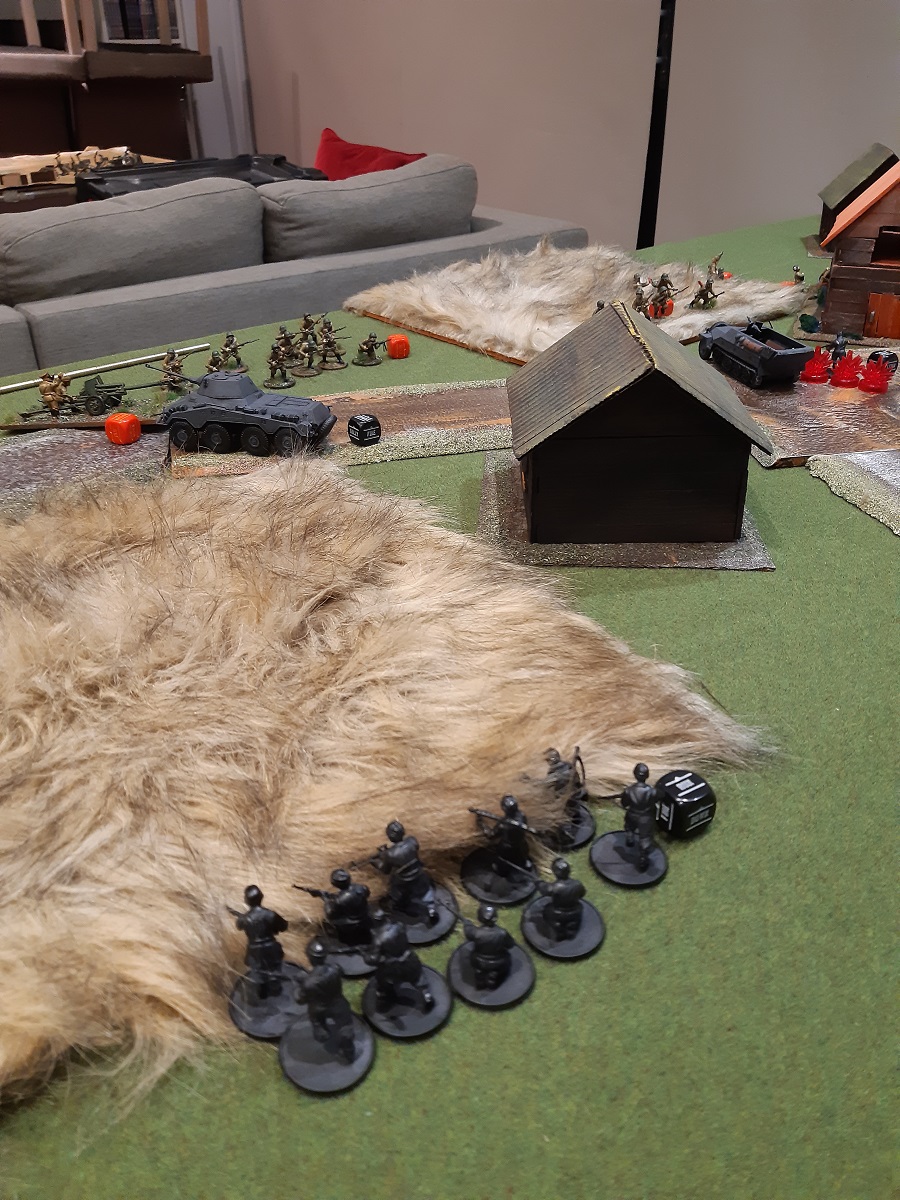
All wasn’t lost for Matthew however, as with clever orders he could secure the intel, then get the squad into his halftrack for a speedy extraction. To support the plan, he advanced his vehicle, firing on my 1st LMG squad when he arrived in the middle, though they suffered no loss. The squad’s good luck continued when, two orders later, the German mortar failed to hit despite having been ranged in.
To stifle his plans, I advanced my 2nd LMG squad and opened up on the German rifle squad, scoring three kills. More important however was the one pin as, when ordered to run, the squad failed its order test and went down instead.
Meanwhile on the left I continued the pressure, taking out the flamethrower squad with my 3rd LMG squad and continuing to whittle down the assault rifle squad with my Maxim and T34/85, though my mortar continued to be ineffective. Matthew rallied the assault rifles however and cleared all its pins, ready for a manoeuvre next turn.

Final moves of the turn for me included my rifles going down of their own accord, Zis going into ambush, and my lieutenant running into the barn. I also sent my medic into the middle to grab the intel, which I realise now might’ve been impossible, but we were caught up in the moment. As for Matthew, he moved his lieutenant out from behind the hill and took a long shot at my medic, but missed.
Turn five with the German order dice pool being much depleted, while mine remained almost entirely intact, it was no surprise I scored the first dice. I ran my medic into the barn and passed the intel off to my lieutenant. Though the Hanomag turned to open up on my officer, he was only able to kill my staff member. Further, my lieutenant passed his morale test to be able to run out of the barn and into the field, a single order away from getting off the board.
It was clear where the battle was headed. As a result, after my 2nd LMG squad picked off another three from the German rifle squad, Matthew charged the squad into my unit and saw the remaining four men killed for the loss of two brave Soviet heroes. Meanwhile on the left, the assault rifles went at my T34/85 while under machine gun fire. Their assault was ineffective however and I charged my 3rd LMG squad in to see them off.

The rest of the action of the turn included my Zis being unable to hit the Hanomag, my rifles going down (intentionally this time), the German mortar continuing to shell my 1st LMG squad, and the German lieutenant going down.

And so we arrived at turn six. As to be expected, I scored the first dice and saw my lieutenant safely off the field, successfully securing the intel.
Aftermath
Though it may read like a victory in which my forces were very much on top throughout the battle, I can assure you it was a very tense game. Matthew very nearly stole the intel out from underneath my nose. With a slightly adjusted battle plan, more cautious use of his vehicles, and more concentrated offensive he well could have seen me undone.
My efforts were assisted undeniably by some incredible shooting. The number of times I needed 5s to his and yet netted more than 50% hits was extraordinary. As for my flamethrower, I’m sure he’ll do well one day. One day.
Regarding my medic collecting the intel, I realised as I was writing the report up that it might not have been possible. Medics are ignored for the purpose of determining control of objectives according to the rulebook, so I suspect that captures possessing the objective in Top Secret as well.
I doubt the outcome would have been much different if that were the case however, I could have easily picked the intel up with my lieutenant instead. It likely would’ve just delayed my getting it off the field by a turn, though if my rifle squad obeyed an order that mightn’t’ve been an issue either.
Of course, I think it was pretty cool how things played out anyway.
Final Thoughts
I’m not sure when I’ll be able to have a battle next. The Delta strain of COVID-19 has made its ugly appearance here and the state is in lockdown, though things appear to be progressing most agreeably.
On top of that, I’ve just returned to uni to do law. I’m hopeful I can find half a moment between working full-time and studying part-time to get another battle in once we are able to interact face-to-face again.
