Welcome to the first of three battles in a Flames of War mini-campaign my mate and I are doing. It will be an escalation campaign with force size increasing in each battle. Our theatre of operation is North Africa with our battles set during the Second Battle of El Alamein, which took play in late October and November of 1942. The battles will be loosely historical based, by which I mean I’ve selected mission types and objectives that are in line with the order of battle, but no attempt has been made to ensure terrain and force composition is accurate. And please excuse some of the photos, quality wasn’t so great this time round.
Background
24 October 1942, the previous night the Allies initiated Operation Lightfoot – the first stage of the Second Battle of El Alamein. Infantry were sent forward first under the cover of darkness to clear laneways through extensive Axis minefields through which the armoured divisions would attack. Over the course of the day this operation continued, but mine clearing was taking longer than expected and significant resistance was encountered. At dusk the 15th Panzer Division and Italian “Littorio” division mounted a counter attack from a feature known to the Axis as Hill 28 and engaged the 1st Armoured Division in the first major tank battle of the Second Battle of El Alamein.
Battlefield and Mission


I selected the Counterattack mission from the Flames of War rulebook for this battle. This mission calls for deployment in opposing table quarters along the long table edges, with the defenders reserves entering the battlefield from the long table edge of the table quarter diagonally opposite the defenders deployment zone (so the one adjacent the attackers deployment zone). The 15th Panzer Division’s objectives are either of the two ridges on the opposite side of the battlefield.
Forces
15th Panzer Division (everything bar the Panzer III Ns are proxies)
HQ comprised of two Panzer III Js (late)
Three Panzer platoons comprised of:
1st – Three Panzer III Js (Late)
2nd – Two Panzer III Js (Late) and a Panzer III N
3rd – Two Panzer III Js (Late) and a Panzer III N

1st Armoured Division
HQ comprised of thee Sherman IIIs
Two heavy armoured platoons comprised of three Sherman IIIs each
One light armoured platoon comprised of three Honey Stuarts.
Order of Battle
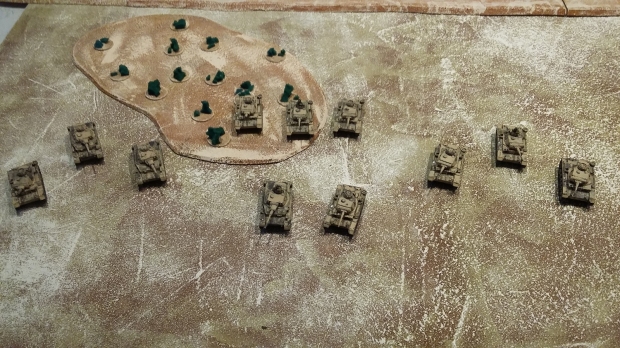
The 1st Armoured Division deployed one platoon of Shermans at the back and centre of their line and the second platoon on their right concealed behind the ridge. The Sherman command platoon and Honey Stuarts were held in reserve. The 15th Panzer division positioned one Panzer platoon front and left (next to the scrub), the second back and right (behind the hill) and the third front and centre the with command platoon behind it.
We, or rather I, made a fantastic mistake right off the bat. Probably because of how much Infinity I’ve played (where the player setting up first is almost always going first), my mate (the defender) went first when it should have been me (the attacker). Whoops! I’ll say more about this mistake in the aftermath, but I don’t think it really would have altered the outcome of things everything else remaining more or less as it was. The battle taking place at dusk, my mate rolled for night and the light held. The Sherman command platoon rolled on from reserve while the other two platoons shifted forward. The command platoon fired on the Panzers on the German right flank, knocking two out and seeing the other one reverse and high tail it home. Then on the left two more Panzers were knocked out, but this time the third stayed put. Meanwhile in the centre, two Panzers bailed but nothing went boom. Not a good start for me!
In the German turn, only one bailed Panzer remounted (but I forgot protected ammo, which likely would’ve seen the other remounted). I then rolled for night and the darkness descended on the battlefield. I was hopeful that I would be able to use the cover of night to advance more cautiously and force my mate to come to me. My Panzer crew’s night vision was, however, as bad as the shooting of those who actually could see. I did manage to bail a couple of Shermans in the centre, but it wasn’t much consolation for a brutal turn one. I Stormtrooper my command platoon up, but have the rest hold.


British turn two and the Command platoon moves up to set up a nasty pincer move. The Shermans on the British right stay put but the ones in the centre remount and move up a little. Thankfully the cover of darkness, poor shooting and Krupp steel saw my remaining Panzers through the turn safely. I decided to pull my one Panzer on the left back with the intention of repositioning to the centre. My other Panzers moved forward, with all tanks now remounted – I was aware of the danger of the pincer, but figured the aggressive move was worth the risk. Unfortunately my bad run of luck continued. My command platoon couldn’t see past the end of their main gun while the other platoon hit what Paddy shot at.


Turn three and the Stuarts showed up. They were wholly irrelevant however and made their way towards the unguarded objective, which is all that needs said on their behalf. The Command platoon moved up and the platoon on the British right swung toward the centre too – the Bulldog’s jaw was now poised to bite down on my Panzers hard. In the centre things went pearshaped with the Shermans blowing apart my command platoon, the other platoon remained intact though. The other Shermans failed to spot any targets.
In my turn I pulled what was probably an illegitimate move, but hey, all my stuff was going boom and the day was clearly ended badly for Germany so it didn’t bother us. I moved my Panzers in the centre in and through the Shermans in the centre to open up rear armour shots for two of my tanks. The lone Panzer moved towards the centre through the scrub. My Panzers in the centre opened up and managed to destroy a single Sherman. Germany: 1, Britain: 7 – oh dear.


Turn four and the Bulldog’s jaw closed. On the British right the lone Panzer is blown sky high after I forgot to Stormtrooper him the turn before. In the centre the Command platoon helps out the centre platoon by taking out one Panzer while the central platoon out the final two Panzers.

Aftermath
In the actual counterattack that took place on 24 October 1942 some 100 tanks were deployed by the Axis and by the end of the attack over half were destroyed with no ground gained. Our battle most certainly replicated that!
While we did make some errors, notably me having the Defender go first, my rolling was pretty atrocious throughout the game. I also kept forgetting to Stormtrooper things, which is something I’ll have to remember for next time.
That said, however, we both enjoyed the battle immensely. I think the best part was probably the visual spectacle of it all. I am really pleased with how the board turned out and the scene of wrecked tanks littering the desert was just fantastic.
Our second game is in two week’s time and will see the 2nd Armoured Division engaging the 15th Panzer Division while circling the point known as “Woodcock” in a breakthrough mission. Until then, I hope you enjoyed this AAR and look forward to the next one. Happy wargaming!

Loved it.
Must be just about the luckiest Brits on the continent! Looking forward to putting together my own FOW British armoured company for the desert over the next 18 months..
LikeLike
Cheers mate! And, yep, Monty’s boys were bright eyed and bushy tailed and were shooting sharp as!
LikeLike